Automating Chrome History Collection using CrowdStrike and Tracecat - Part 1: Foundation & Discovery
Reading time: ~20 min
Back in July this year, I was fortunate enough to attend a training session at ObjectiveWe London that was focused on incident response (IR) within environments that primarily consist of macOS machines. It was an incredibly valuable training session that provided me with newfound IR insights within a macOS environment. The scenario used within the training showcased how CrowdStrike could be used to extract artefacts from a user’s machine and make them available to download and analyse on your own machine, this was followed up by using sqlite to analyse chrome history files. As you may or may not know, chrome stores its history files in a db file, so in order to analyse it in macOS you need to use sqlite.
If you want to view the directory on your macOS machine where your chrome history files are stored, you can use this command:
ls ~/Library/Application\ Support/Google/Chrome/Default/History
At the end of the training session, I was curious and started thinking whether I could actually automate the entire process of extracting the chrome history files using CrowdStrike real-time response (RTR) and making these available to download in RTR Cloud.
What we’ll be exploring in this 3-part series is how to do all of this in Tracecat, which is a SOAR tool that allows you to make powerful security automations whilst minimising the complexity. We’ll be following some core development principles such as stop-checks, loose couple, abuse-prevention, additional auditing and much more.
I’m incredibly excited to nerd out on this and help you create this workflow yourselves and perhaps even build on it or make customisations tailored to your environments.
Design Principles
Throughout the workflow we’ll be adding various RUN_IF conditions to ensure that the workflow only proceeds if a specific condition is met, this is intentional to ensure that the workflow runs in the successful conditions as what we’re doing in this workflow is incredibly powerful and we want to eliminate any margin of error as we’re going to be touching a user’s machine so we don’t want to mess anything up.
We’ll also be using a combination of case comments and slack messages to setup notifications for successful/failed actions, this is to create an audit trail during the workflow to ensure that we’re notified of the key actions taking place and also incorporating additional monitoring to ensure that there’s wider awareness on when RTR is being used as this is a powerful capability with the potential to have adverse impact if used incorrectly.
Our Notification Strategy
This workflow uses two notification channels with different purposes:
Case Comments (Documentation) Case comments create a permanent audit trail in Tracecat case management, capturing technical details, forensic decisions, and building a chronological timeline for incident reports. They provide real-time visibility for other security team members monitoring the case.
Slack Messages (Communication) Slack messages broadcast to your channel for team awareness and mobile alerts. This helps provide transparency of RTR usage, enable threaded discussions, and allow immediate escalation when needed.
A Note on Python Scripts vs AI Actions
This tutorial uses Python extensively for parsing, filtering, and validation tasks (extracting users, parsing Chrome paths, validating devices). Python scripts are free, provide deterministic behavior which is critical for forensic reproducibility, and can be generated or modified using AI coding assistants like ChatGPT or Claude, so you don’t need to be a Python expert to follow along and ensures anyone can follow this tutorial and build the workflow regardless of their tooling budget
The AI Alternative: Tracecat supports AI-powered actions that could replace many of these parsing tasks. AI actions are easier to manage (natural language prompts vs code), more flexible with edge cases, and faster to build. However, not all users have access to AI API keys (OpenAI, Anthropic, etc.) and I want this tutorial to be universally accessible.
Future Iterations: Once you’re comfortable with this foundation, consider experimenting with AI actions for more flexible data extraction, intelligent error handling, or dynamic case comment generation based on findings.
Prerequisites
Before we start building, you’ll need:
| Category | What You Need | Notes |
|---|---|---|
| Infrastructure | •Tracecat instance •CrowdStrike Falcon EDR •Slack workspace |
Self-hosted or cloud-hosted Tracecat |
| Credentials | •CrowdStrike API Client ID & Secret •Slack Bot Token |
•Configure both in Tracecat secrets •Crowdstrike API Client with RTR permissions •Slackbot with chat:write scope required |
| Test Environment | • macOS device with RTR access enabled • Chrome browser installed |
⚠️This workflow modifies /tmp directory |
| Skills Assumed | • Basic YAML understanding •Comfortable with JSON/Python •Familiarity with REST APIs |
We’ll walk through all scripts step-by-step |
Don’t have everything? Don’t sweat it if you don’t have all of this, just follow along anyway and you can adapt to your environment.
The Workflow Architecture
| Phase | Actions | Status |
|---|---|---|
| Phase 1: Foundation | Create case → Find device → Validate macOS → Init RTR → Discover users → Find Chrome | ✅ Covered in this post |
| Phase 2: Collection | Hash files → Copy to /tmp → Validate → Zip → Hash zip → Upload | 🔜 Coming soon |
| Phase 3: Cleanup | Remove temp files → Verify cleanup → Close RTR → Final audit | 🔜 Coming soon |
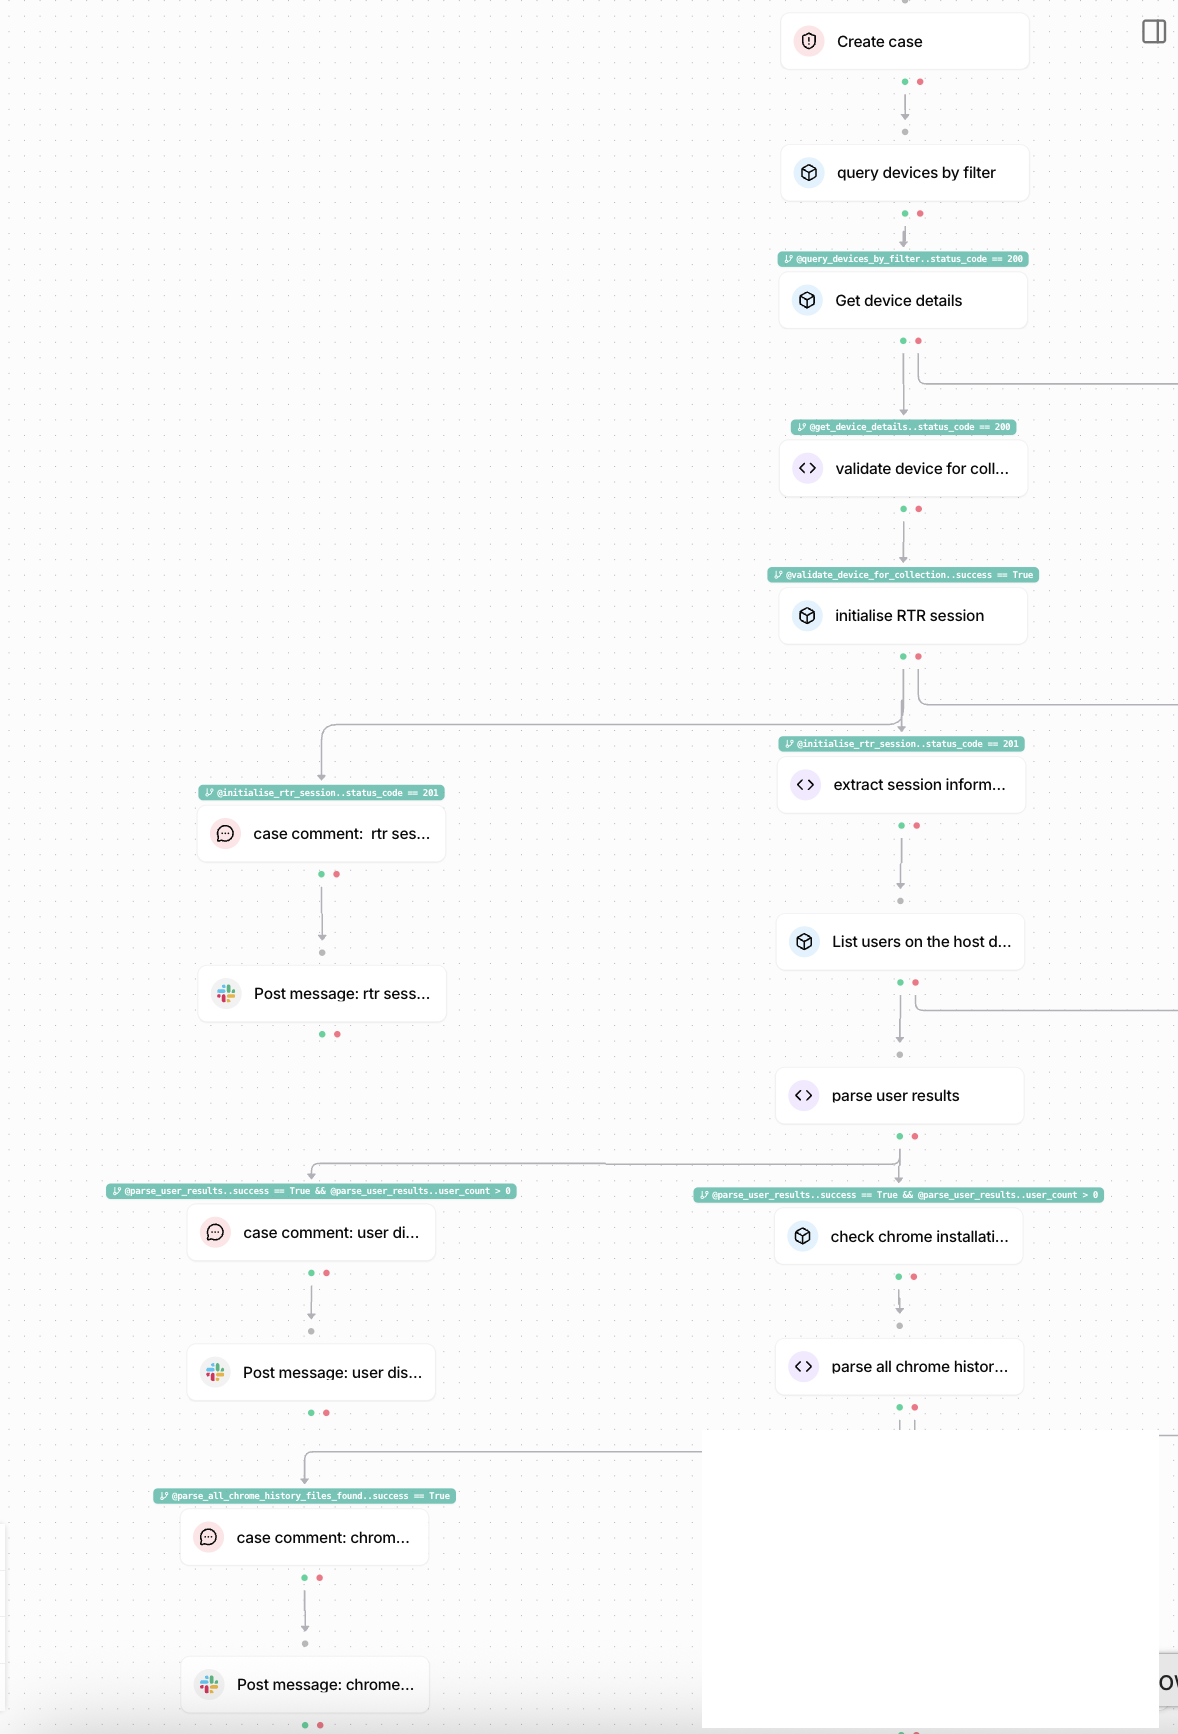
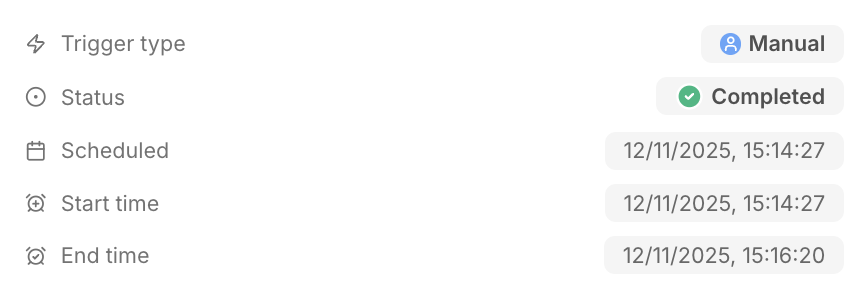
Total time to execute: 2-3 minutes vs 15-25 minutes manually.
Section 1: Building the foundation
To begin the workflow, we want to create some core foundations that will allow us to use information that will be used throughout the workflow. The first being creating a tracecat case, this allows us to create a report to allow us to track and audit whenever we run a tracecat workflow, especially with something as powerful as RTR we want to maintain transparency and ensure we know this isn’t being abused. The second part to this is querying the CrowdStrike APIs to obtain the device details to get the user’s device agent ID (AID) and confirm that their device is operating a macOS system.
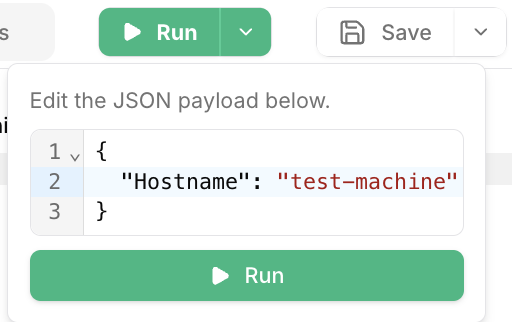
This workflow is based on using a trigger to initiate and run the workflow. What we’ll need to do is create it by clicking the down arrow button and entering the hostname of your device.
Action 1: Create tracecat case
What it does: Creates an incident case in Tracecat’s case management system to track this collection operation.
Why it matters: This creates an audit trail from the start as the case ID (${{ ACTIONS.create_case.result.id }}) is referenced throughout the workflow. Additionally, the case number will be used in the evidence package naming convention. Every RTR operation needs justification, this case becomes your paper trail. The ${{ TRIGGER.Hostname }} variable comes from the workflow trigger we created above.
How to add it:
- Create a new action with type
core.cases.create_case - Configure the following fields:
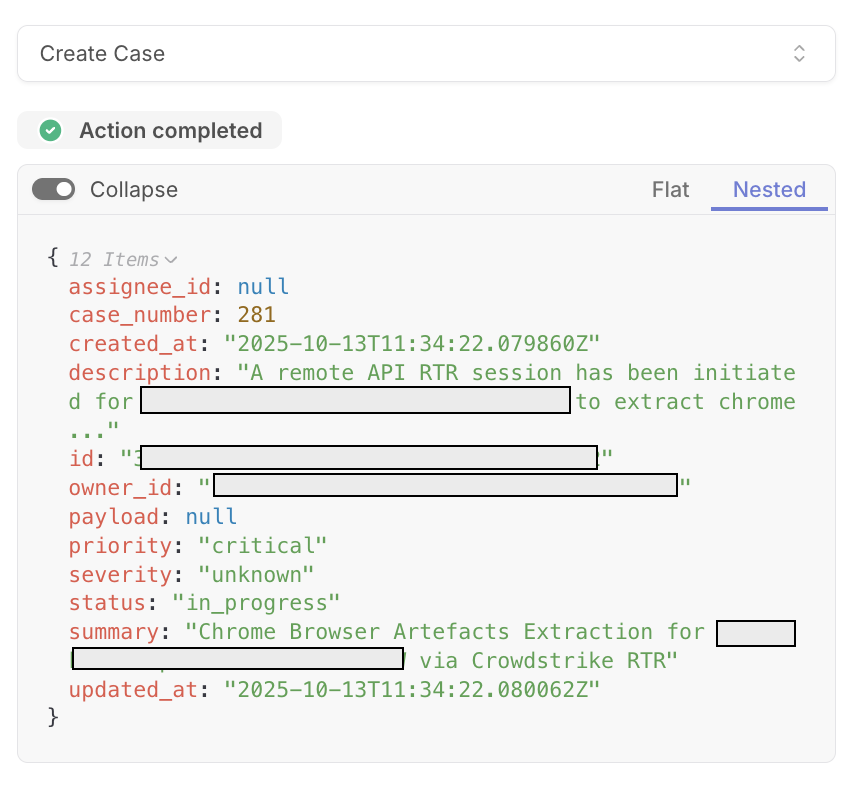
summary: Chrome Browser Artefacts Extraction for ${{ TRIGGER.Hostname }} via CrowdStrike RTR
description: A remote API RTR session has been initiated for ${{ TRIGGER.Hostname }} to extract chrome browser history for all profiles on the host's macOS device
priority: critical
status: in_progress
What you’ll see: If this action runs successfully, a new case that will be generated with a case number and the pre-configured fields.
Action 2: Obtain CrowdStrike Hostname Device Agent ID
What it does: Perform a CrowdStrike operation to find the agent ID of a device based on the hostname provided.
Why it matters:
The agent ID is a unique identifier for a CrowdStrike device that we will use to perform RTR operations, we need to confirm and verify that we are targeting the correct device for to use later on. As the hostname filter is case-sensitive, we need to ensure the trigger data matches CrowdStrike exactly
How to add it:
- Create a new action with type
tools.falcon.call_command - Configure the following fields:
operation_id: QueryDevicesByFilter
params:
  filter: hostname:' ${{ TRIGGER.Hostname }}'
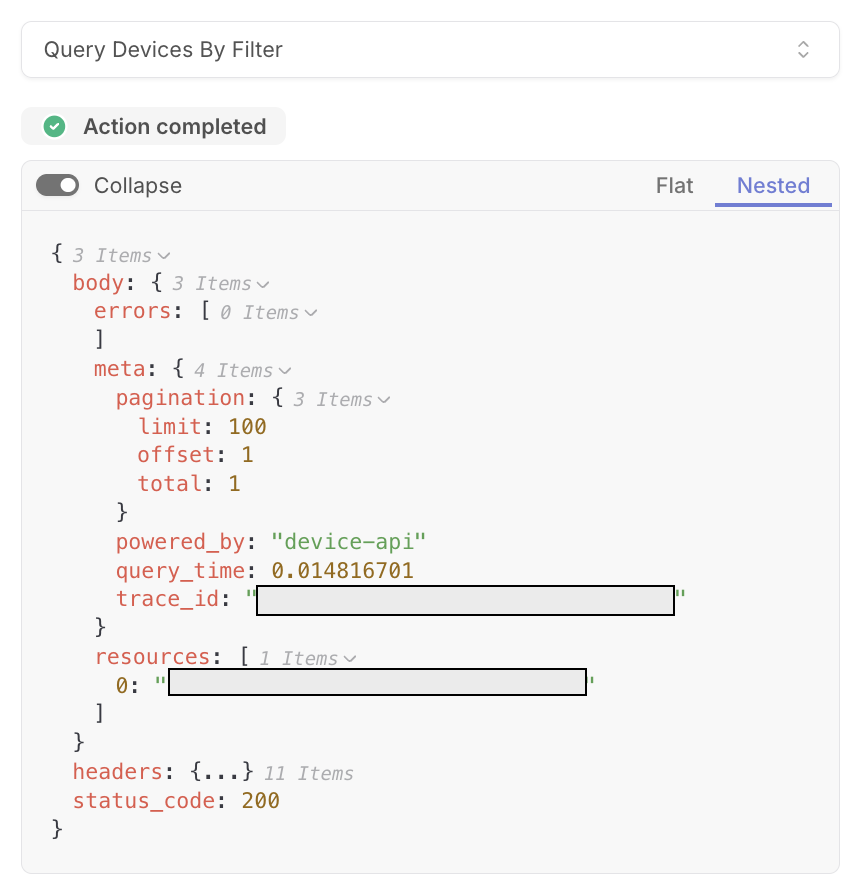
What you’ll see: If the action is successful, you will see a response containing resources: [array with device ID].
Action 3: Getting the Device Details from CrowdStrike
What it does: Conducts another CrowdStrike query to obtain comprehensive device details including platform type, OS, OS version and RTR status. Includes a run condition to only execute if the previous action returned HTTP 200.
Why it matters: Since we’re only focused on macOS devices, this action confirms the target host is actually a macOS machine. If the previous request fails, this action won’t run, indicating an error with the provided hostname.
How to add it:
- Create a new action with type
tools.falcon.call_command - Configure the following fields:
operation_id: GetDeviceDetails
params:
  ids: ${{ ACTIONS.query_devices_by_filter.result.body.resources[0] }}
Add run condition:
${{ ACTIONS.query_devices_by_filter.result.status_code == 200 }}
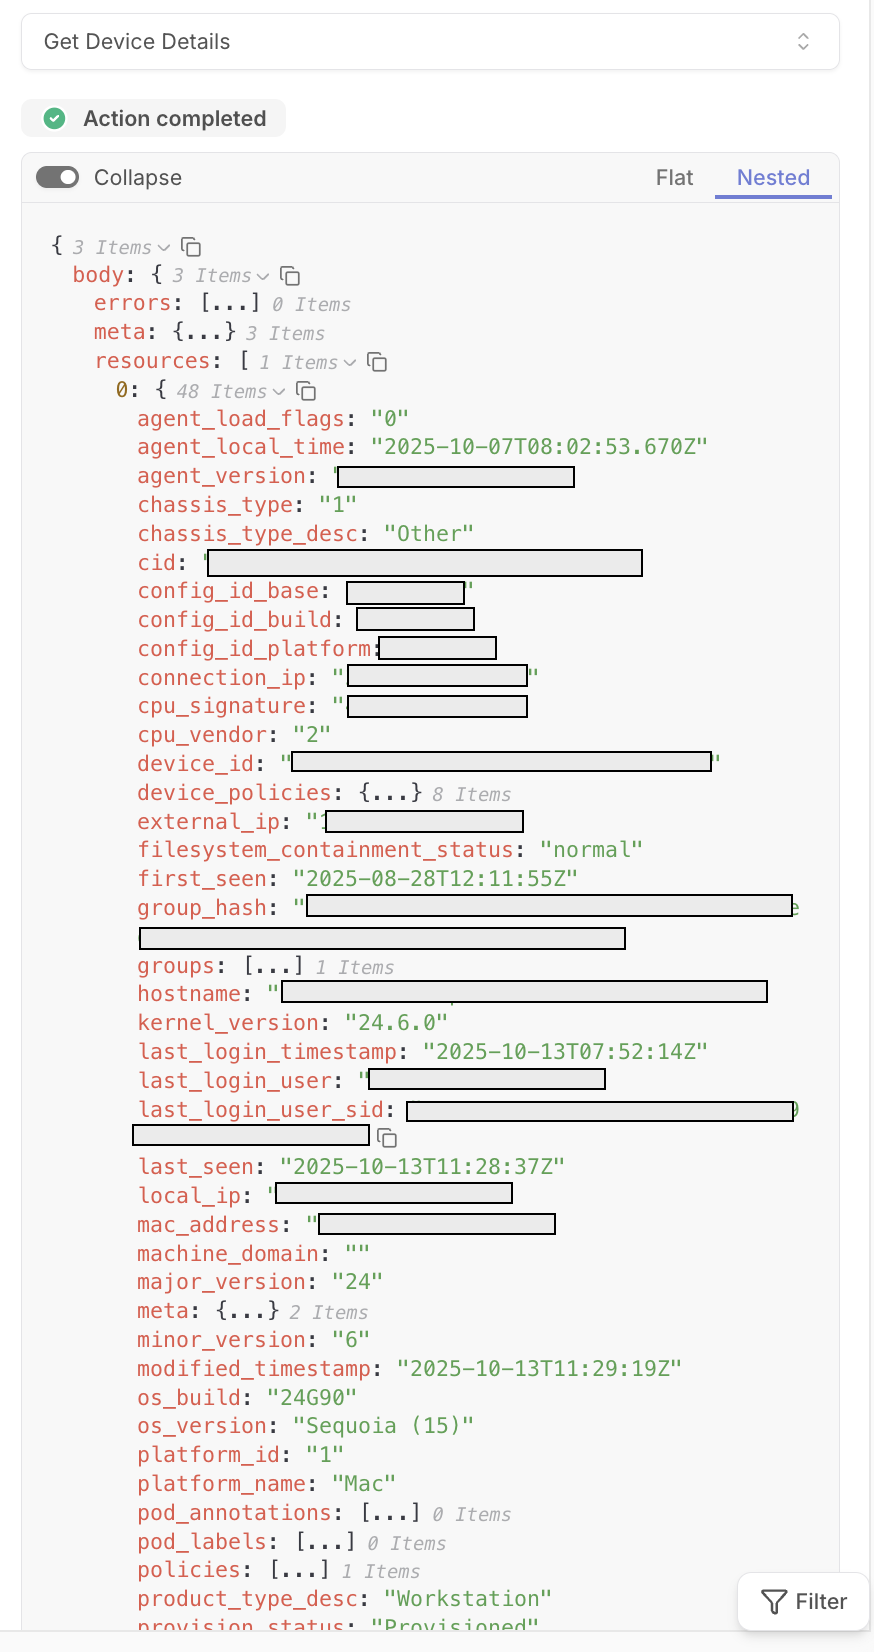
What you’ll see: If the action is successful, you will see a comprehensive response with 40+ device attributes, including: platform, OS version, network info, device status and last seen timestamps
Action 4: Obtaining and Validating the Device
What it does: Validates that the target device is a macOS system before attempting forensic collection. Extracts key device metadata for chain of custody documentation.
Why it matters: This pre-flight check prevents failed collection attempts and ensures you’re collecting from the right device type. It establishes the foundation by capturing device identifiers, network information, and timestamps critical for auditing and incident reporting. Additionally this also check the device status to avoid trying to connect to offline endpoints
How to add it:
- Create a new action with type
core.script.run_python - Add the following script:
script: |
  def main(device_details):
    """
    Validates that the target device meets forensic collection requirements.
    This is a critical pre-flight check before initiating remote evidence collection.

    Args:
        device_details: Device information from CrowdStrike API

    Returns:
        Dictionary with success status, device_id, and system_info for chain of custody
    """

    # ============================================================================
    # PLATFORM VALIDATION
    # ============================================================================
    # This workflow uses macOS-specific file paths (/Users/, /Library/, etc.)
    # Extract platform name and convert to lowercase for case-insensitive comparison

    platform = device_details.get("platform_name", "").lower()

    # Reject non-macOS devices to prevent path errors or failed collections
    if platform != "mac":
        return {
            "success": False,
            "error": f"Device is not macOS (platform: {platform}). This workflow only supports macOS."
        }

    # ============================================================================
    # DEVICE STATUS CHECK
    # ============================================================================
    # RTR requires the device to be online and responsive
    # Check if device status is "normal" (online, not contained, no errors)
    status = device_details.get("status", "")

    if status != "normal":
        return {
            "success": False,
            "error": f"Device status is '{status}'. Device must be online and normal status for RTR collection."
        }

    # ============================================================================
    # FORENSIC METADATA EXTRACTION
    # ============================================================================
    # Establishes chain of custody and provides context for investigation
    # Extract key device identifiers and network information for documentation
    # This metadata will be included in case notes for forensic reporting

    system_info = {
        "hostname": device_details.get("hostname"),
        "platform": device_details.get("platform_name"),
        "os_version": device_details.get("os_version"),
        "last_seen": device_details.get("last_seen"),
        "first_seen": device_details.get("first_seen"),
        "system_manufacturer": device_details.get("system_manufacturer"),
        "system_product_name": device_details.get("system_product_name"),
        "external_ip": device_details.get("external_ip"),
        "local_ip": device_details.get("local_ip")
    }

    # ============================================================================
    # SUCCESS RESPONSE
    # ============================================================================
    # Return validated device_id for RTR session initialization
    # system_info will be used for case documentation and audit trail

    return {
        "success": True,
        "device_id": device_details.get("device_id"),  # Required for RTR session
        "system_info": system_info                      # For forensic documentation
    }

inputs:
  device_details: ${{ ACTIONS.get_device_details.result.body.resources[0] }}
Add run condition:
${{ ACTIONS.get_device_details.result.status_code == 200 }}
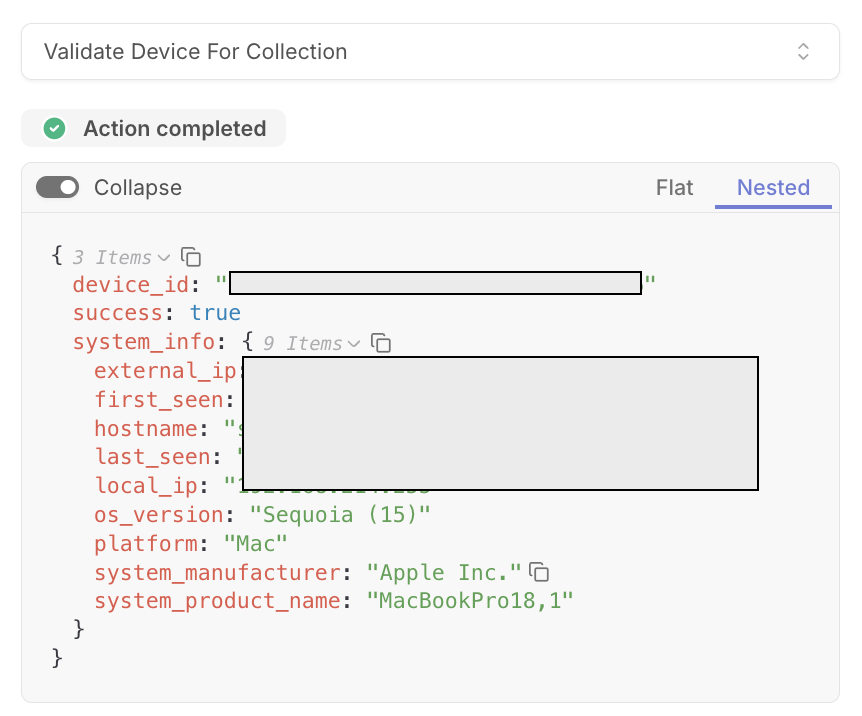
What you’ll see: If the action is successful, you will see a success response with success: true, device ID for RTR session and system info dictionary with hostname, IPs, OS version, timestamps.
Action 5: Failure Notification Slack Messages
What it does: Sends immediate Slack alerts when critical early-stage actions fail (device retrieval, RTR session initialization, or user discovery), notifying your team that the forensic collection workflow cannot proceed.
Why it matters: Early detection prevents wasted effort and ensures rapid incident response. If any foundational steps fail, the workflow cannot collect Chrome history. These notifications ensure your team knows immediately about:
- Device might not exist in CrowdStrike or is unreachable
- RTR session couldn’t be established (device offline, permissions issue, API error)
- No user accounts were found or user discovery failed
How to add it:
- Create a new action with type
tools.slack.post_message - Set the dependency to the CrowdStrike actions (triggers only on failure)
- Configure the following fields:
channel: **ADD YOUR SLACK CHANNEL ID HERE**
blocks:
  - type: section
    text:
      type: mrkdwn
      text: |-
        🚨 *Forensic Collection Workflow Failed*

        The Chrome history collection workflow has encountered an error and could not complete successfully.
  - type: divider
  - type: section
    text:
      type: mrkdwn
      text: |-
        *Failure Details:*
        • Target Device: ${{TRIGGER.Hostname}}
        • Case ID: ${{ACTIONS.create_case.result.case_number}}
        • Timestamp: ${{FN.now()}}
  - type: divider
  - type: section
    text:
      type: mrkdwn
      text: |-
        *Immediate Actions Required:*
        • Review workflow execution
        • Investigate failure cause
        • Manual intervention may be required
        • Consider re-running collection if safe to do so
  - type: divider
  - type: section
    text:
      type: mrkdwn
      text: |-
        *🔗 Investigation Links:*
        • <https://tracecat.com/|*View Workflow Execution*> - Review failure details
        • <https://tracecat.com|*Case Management*> - Review case status
        • <https://[insert your CrowdStrike url here]/real-time-response/sessions/audit-logs|*RTR Audit Logs*> - Check RTR session status
  - type: divider
  - type: section
    text:
      type: mrkdwn
      text: ⚠️ *Forensic collection incomplete - manual review required*
What you’ll see: You should see a slack message in the channel you’ve set including details of the Target hostname and case ID, timestamp of failure and links to workflow execution logs and case details
Section 2: Setting up CrowdStrike RTR
Now that we’ve got a foundation to work off from, we’re ready to connect to the user’s machine. This section focuses on initiating RTR and parsing key information that we’ll use throughout the workflow. We’ll then create our first set of actions mentioned in our notification strategy section: Tracecat case comments and Slack messages.
Action 6: Start RTR Session on Target Device
What it does: Establishes a RTR batch session with the validated macOS device using CrowdStrike’s API. This creates the remote terminal connection that allows you to execute commands on the endpoint without requiring SSH or direct access.
Why it matters: This is the gateway action for forensic collection as we this is where we first connect to the remote machine. Once this session is established, you have a secure command channel for the rest of the forensic workflow which will allow us to do the following:
- Execute commands on the remote endpoint
- Copy files from the device
- Generate file hashes for chain of custody
- Retrieve browser history artifacts
The queue_offline: false parameter is critical as it ensures the workflow fails immediately if the device isn’t online, rather than queuing the session and waiting indefinitely. This gives you instant feedback during active incidents when timing matters.
How to add it:
- Create a new action with type
tools.falconpy.call_command - Add dependency on
validate_device_for_collection(only runs after validation passes) - Configure the following fields:
operation_id: BatchInitSessions
params:
  body:
    host_ids:
      - ${{ ACTIONS.validate_device_for_collection.result.device_id }}
    queue_offline: false
Add run condition to check validation succeeded:
${{ ACTIONS.validate_device_for_collection.result.success == True }}
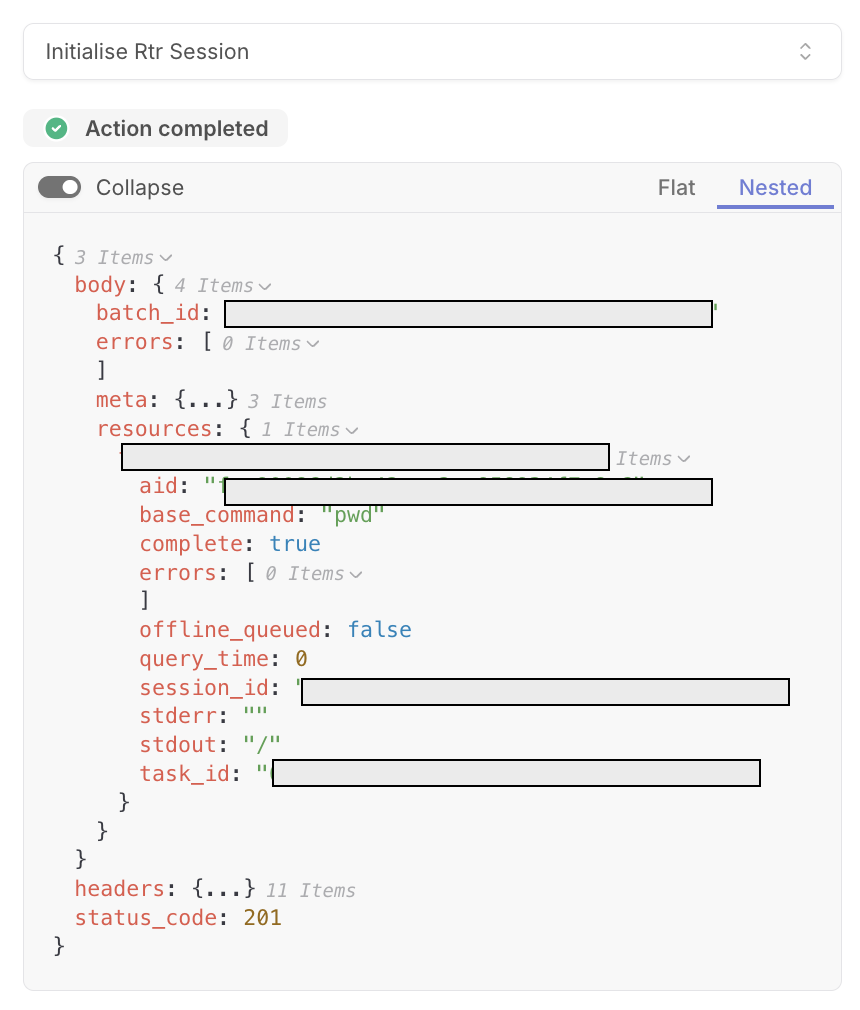
What you’ll see: If the action is successful, you will see a success response with
batch_id, session_id and device_id.
If the device is offline or unreachable, you’ll see HTTP 400/404 with error details, triggering your failure notification workflow.
Action 7: Extract Session Information
What it does: Parses the RTR session initialization response to extract session identifiers (batch_id, session_id, device_id) that will be used in every subsequent RTR command. This action validates the session was created successfully and structures the data for easy reference throughout the workflow.
Why it matters: CrowdStrike’s RTR API response is nested JSON with dynamic keys (device IDs vary per endpoint). I like to think of this as your “session receipt”, it confirms your remote connection and provides all the credentials needed for the duration of the RTR session to collect forensic evidence.
How to add it:
- Create a new action with type
core.script.run_python - Set dependency on
initialise_rtr_session(runs after session creation) - Configure the following fields:
script: |
  def main(rtr_response):
    """
    Extracts and validates RTR session identifiers from CrowdStrike API response.

    Args:
        rtr_response: Full API response from BatchInitSessions operation

    Returns:
        Flattened session data with batch_id, session_id, device_id for forensic commands
    """

    # ============================================================================
    # STATUS CODE VALIDATION
    # ============================================================================
    # Why: Confirm session creation succeeded before extracting data
    # How: Check for HTTP 201 (Created) - the success code for RTR sessions

    if rtr_response.get("status_code") != 201:
        errors = rtr_response.get('body', {}).get('errors', [])
        return {
            "success": False,
            "error": f"Failed to start batch RTR session: {rtr_response.get('status_code')} - {str(errors)}"
        }

    # ============================================================================
    # BATCH ID EXTRACTION
    # ============================================================================
    # Why: batch_id is required for ALL subsequent RTR commands (ls, cp, get, etc.)
    # How: Extract from top-level body - this is your "session group identifier"

    batch_id = rtr_response.get("body", {}).get("batch_id")
    if not batch_id:
        return {
            "success": False,
            "error": "No batch_id returned from batch session initialization"
        }

    # ============================================================================
    # DEVICE SESSION RESOURCES
    # ============================================================================
    # Why: Resources contain per-device session details (session_id, pwd, errors)
    # How: Navigate to nested resources object - structure is {device_id: {session_data}}

    resources = rtr_response.get("body", {}).get("resources", {})

    if not resources:
        return {
            "success": False,
            "error": "No session resources returned"
        }

    # ============================================================================
    # DYNAMIC DEVICE ID EXTRACTION
    # ============================================================================
    # Why: Device IDs are dynamic - we can't hardcode them in expressions
    # How: Get the first (and should be only) key from resources dictionary
    # Note: We only initialized one device, so resources should have exactly one entry

    device_id = list(resources.keys())[0]  # Extract the device ID dynamically
    session_info = resources[device_id]     # Get that device's session data

    # ============================================================================
    # SESSION DATA ASSEMBLY
    # ============================================================================
    # Why: Create clean, flat structure for easy reference in downstream actions
    # How: Extract session_id, working directory, and status flags
    return {
        "success": True,
        "batch_id": batch_id,              # Required for all RTR commands
        "device_id": device_id,            # Confirms which device we're connected to
        "session_id": session_info.get("session_id"),  # Unique session identifier
        "pwd": session_info.get("stdout", "/"),        # Current directory (from auto-run pwd)
        "complete": session_info.get("complete", False),  # Session initialization status
        "errors": session_info.get("errors", [])         # Any initialization warnings
    }

inputs:
  rtr_response: ${{ ACTIONS.initialise_rtr_session.result }}
Add run condition checking for HTTP 201 success status:
${{ ACTIONS.initialise_rtr_session.result.status_code == 201 }}
What you’ll see: If the script runs successfully, you should see output with the following details and a true value next to success.
Action 8: Case Comment RTR Initialisation
What it does: Creates a timestamped comment in the Tracecat case management system documenting that the RTR session was successfully established. Think of this comment as a forensic audit log entry, recording the exact moment remote access was initiated, which device was accessed, and the platform type.
Why it matters: Documentation is critical in forensic investigations. Every action taken during evidence collection must be logged with:
- What happened: RTR session initiated
- When it happened: Timestamp from CrowdStrike’s API response
- Where it happened: Target hostname and device ID
- Who initiated it: Implicit in the case ownership
This comment creates the start of an immutable audit trail that can be presented in incident reports or audits.
How to add it:
- Create a new action with type
core.cases.create_comment - Set dependency on
initialise_rtr_session(runs after session creation) - Configure the following fields:
case_id: ${{ ACTIONS.create_case.result.id }}
content: "RTR Session Established - Remote terminal response session successfully initiated with target endpoint ${{ TRIGGER.Hostname }} (Device ID: ${{ ACTIONS.validate_device_for_collection.result.device_id }}) at ${{ ACTIONS.initialise_rtr_session.result.headers.Date }}. Platform: macOS. Chain of custody initiated for Chrome browser history collection."
Add run condition checking for HTTP 201 success status:
${{ ACTIONS.extract_session_information.result.status_code == 201 }}
What you’ll see: If you go to the case management view and click on the case that was created at the beginning, you should see a comment within the case.

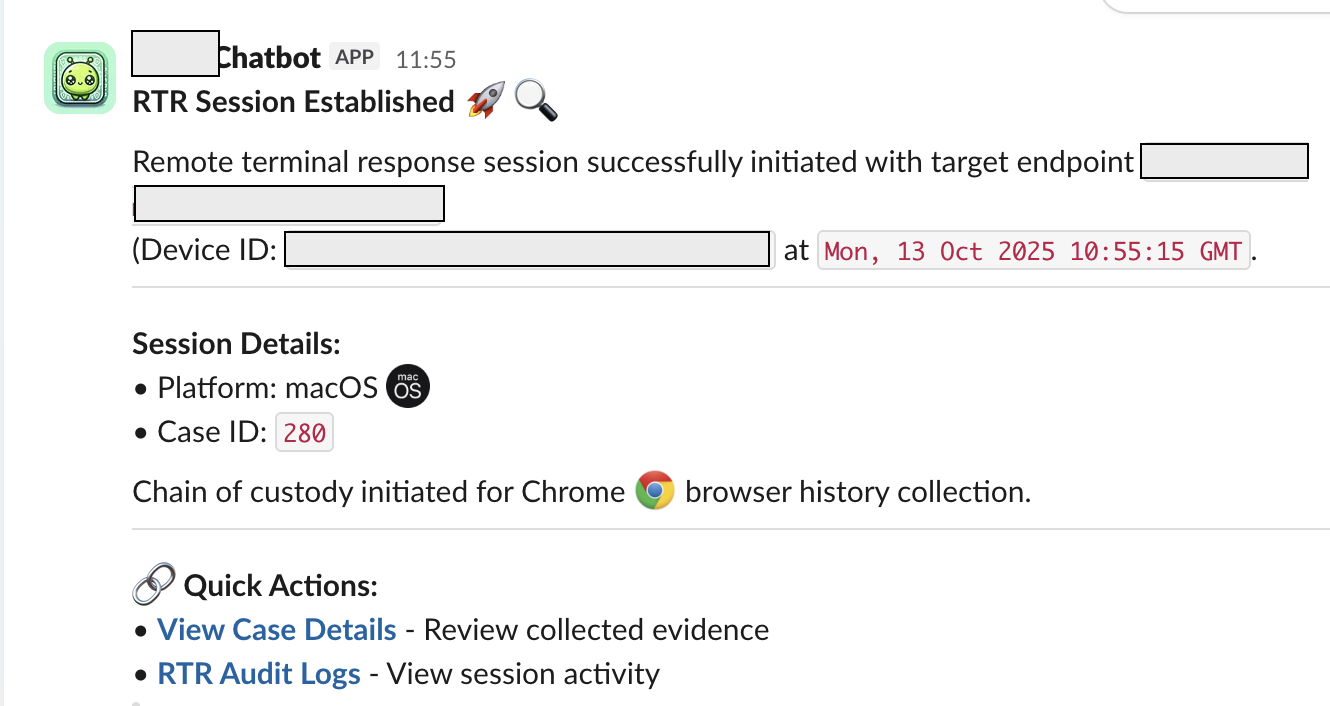
Action 9: Post Message RTR Session Initialised
What it does: Sends a formatted Slack message to your Slack channel immediately after the RTR session is established, providing real-time visibility into active RTR sessions. The message includes session identifiers, device details, and quick-access links to Tracecat’s case management and CrowdStrike audit logs.
The formatted blocks with emojis and clickable links can be customised to your liking. I have a personal preference towards using a combination of emojis and Slack formatting to ensure the message is easily readable. I typically try to avoid using ‘walls-of-text’ types of Slack notifications as this can make them overwhelming. The Slack messages are a way of providing a quick update of what’s going on. I always ask for feedback on my Slack messages to gather collective feedback on how to improve them.
Why it matters: Real-time awareness is critical during active investigations. While case comments create a permanent audit trail, Slack notifications help ensure your team knows right now that:
- A RTR session has started on a user’s device
- Which case to monitor for evidence retrieval
- Where to find detailed session logs if intervention is needed
- If there are multiple people working in parallel investigations that need status updates
- Creates a way to receive mobile alerts about RTR sessions
How to add it:
- Create a new action with type
tools.slack.post_message - Set dependency on
case_comment_rtr_session_initialised(runs after case documentation) - Update channel with your Slack channel ID
- Customize the URLs to match your instances
- Configure the following fields:
channel: **ADD YOUR SLACK CHANNEL ID HERE**
blocks:
  - type: section
    text:
      type: mrkdwn
      text: |-
        *RTR Session Established* :rocket-intensifies: 🔍

        Remote terminal response session successfully initiated with target endpoint `${{ TRIGGER.Hostname }}`
        (Device ID: `${{ ACTIONS.validate_device_for_collection.result.device_id }})` at `${{ ACTIONS.initialise_rtr_session.result.headers.Date }}`.
  - type: divider
  - type: section
    text:
      type: mrkdwn
      text: |-
        *Session Details:*
        • Platform: macOS :macOS-dark:
        • Case ID: `${{ ACTIONS.create_case.result.case_number }}`

        Chain of custody initiated for Chrome :chrome: browser history collection.
  - type: divider
  - type: section
    text:
      type: mrkdwn
      text: |-
        *🔗 Quick Actions:*
        • <https://XXX.tracecat.com/workspaces/XXX/cases|*View Case Details*> - Review collected evidence
        • <https://XXXXX.CrowdStrike.com/real-time-response/sessions/audit-logs|*RTR Audit Logs*> - View session activity
What you’ll see: You should see a slack message in your channel that provides all the details you included in the configuration.
Section 3: RTR Operations - User Discovery + Chrome Detection
We’re at the final section of this week’s workflow. We now need to confirm the primary user account on the machine as well as confirming that Chrome is installed. If Chrome is installed, we want to ensure we capture all the Chrome history profiles found. We’ll be using Python to do some data parsing to allow us to neatly extract the data from the CrowdStrike actions so that we can easily use them in subsequent actions downstream in the workflow.
User Discovery
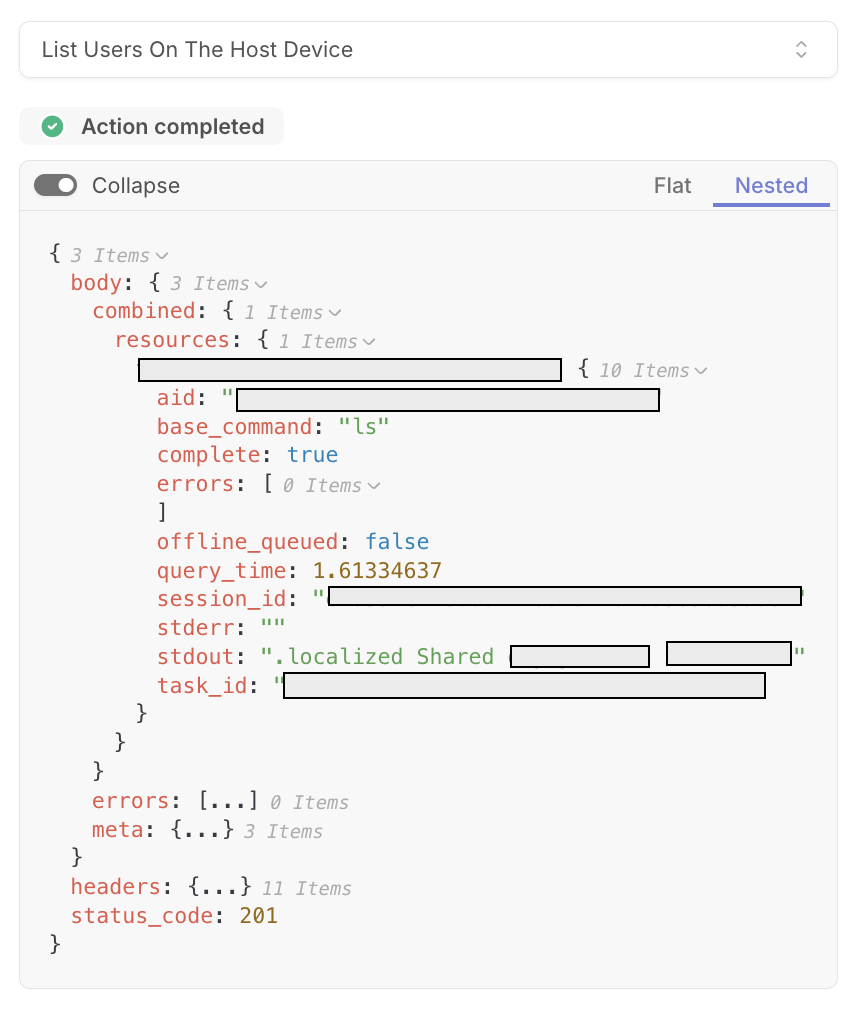
Action 10: List Users on the Host Device
What it does: Executes the ls /Users/ command via RTR to enumerate all user directories on the macOS device. This discovers which user accounts exist on the system, allowing the workflow to target the correct user’s Chrome profile for browser history extraction.
Why it matters: You can’t collect browser data without knowing whose browser to collect from. Chrome history is stored in user-specific paths like /Users/[username]/Library/Application Support/Google/Chrome/. This action solves the “which user?” problem by:
- Discovering all local user accounts on the device (e.g., jdoe, admin, guest)
- Avoiding hardcoded usernames that would break the workflow on different machines
- Handling multi-user systems where multiple people use the same Mac
- Filtering system accounts in the next step (the parse action removes .localized, Shared, admin, etc.)
During investigations where you may know the hostname but not the exact username on the machine, this action serves as a critical discovery step to ensure we know which username to use to find the right Chrome user profiles. We want to make this workflow dynamic whereby we avoid hardcoding any values.
How to add it:
- Create a new action with type
tools.falconpy.call_command - Configure the following fields:
operation_id: BatchCmd
params:
  body:
    base_command: ls
    command_string: ls /Users/
    batch_id: ${{ ACTIONS.extract_session_information.result.batch_id }}
    session_id: ${{ ACTIONS.extract_session_information.result.session_id }}
What you’ll see: You should see a response detailing all the user accounts on the macOS machine in the stdout field.
Action 11: Parse User Results
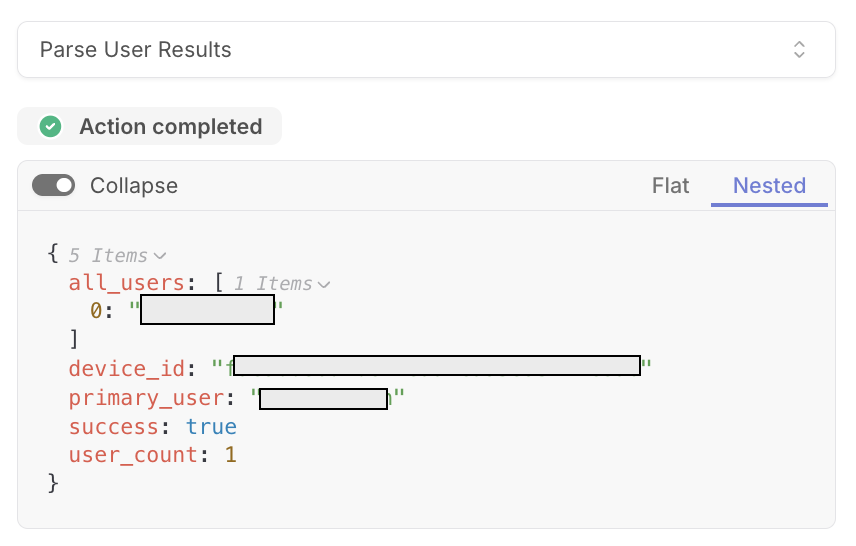
What it does: Parses the output from the ls /Users/ command to extract legitimate user accounts while filtering out system directories, administrative accounts, and macOS system users. Returns a clean list of regular users and automatically selects the primary user for Chrome history collection.
Why it matters: Raw directory listings contain non-user entries. The /Users/ folder contains system directories like .localized, Shared, and administrative accounts that typically won’t have personal browser data. The filtering allows our workflow to be focused on user profile histories. We don’t want to run commands and collect Chrome history from directories that aren’t actual users (admin, .localized or Shared). The first regular user becomes the primary_user for collection.
How to add it:
- Create a new action with type
core.script.run_python - Set dependency on
list_users_on_the_host_device - Configure the following fields
script: |
  def main(batch_response):
      """
      Parses /Users/ directory listing to identify legitimate user accounts.
      Filters out system directories and administrative accounts.

      Args:
          batch_response: RTR BatchCmd response from 'ls /Users/' command

      Returns:
          List of regular users with primary_user selected for Chrome collection
      """

      # ============================================================================
      # EXTRACT RESPONSE RESOURCES
      # ============================================================================
      # Why: RTR batch commands nest results in body.combined.resources
      # How: Navigate through the nested structure to access command output
      combined = batch_response.get("body", {}).get("combined", {})
      resources = combined.get("resources", {})

      if not resources:
          return {
              "success": False,
              "error": "No resources returned from user discovery command"
          }

      # ============================================================================
      # DYNAMIC DEVICE ID EXTRACTION
      # ============================================================================
      # Why: Device IDs vary per endpoint - can't hardcode the key name
      # How: Get the first (and only) device from the resources dictionary
      device_id = list(resources.keys())[0]
      device_result = resources[device_id]

      # ============================================================================
      # COMMAND COMPLETION VALIDATION
      # ============================================================================
      # Why: Ensure the 'ls /Users/' command actually finished executing
      # How: Check the 'complete' flag returned by RTR
      if not device_result.get("complete"):
          return {
              "success": False,
              "error": "User discovery command did not complete"
          }

      # ============================================================================
      # STDOUT OUTPUT VALIDATION
      # ============================================================================
      # Why: Need actual directory listing data to parse users
      # How: Extract stdout and verify it's not empty
      stdout = device_result.get("stdout", "")
      if not stdout:
          return {
              "success": False,
              "error": "No output from user discovery command"
          }

      # ============================================================================
      # PARSE DIRECTORY LISTING
      # ============================================================================
      # Why: stdout contains space-separated list of directories from /Users/
      # How: Split on whitespace to get individual directory names
      all_items = stdout.strip().split()

      # ============================================================================
      # SYSTEM ACCOUNT FILTERING - HARDCODED EXCLUSIONS
      # ============================================================================
      # Why: /Users/ contains system directories that aren't actual user accounts
      # How: Define a set of known macOS system directories and admin accounts
      ignore_items = {
          '.localized',   # macOS localization metadata directory
          'Shared',       # Shared user files directory
          'Guest',        # Guest account (temporary, no persistent data)
          '.DS_Store',    # macOS metadata file (shouldn't appear but just in case)
          'admin',        # Common administrative account name
          'administrator',# Windows-style admin account sometimes present
          'root'          # System root user (should never be in /Users/ but filter anyway)
      }

      # ============================================================================
      # MULTI-LAYER USER FILTERING
      # ============================================================================
      # Why: Need to identify legitimate human users, not system/service accounts
      # How: Apply multiple filters to catch different types of non-user accounts
      regular_users = []
      for item in all_items:
          # Filter 1: Not in hardcoded ignore list
          # Filter 2: Doesn't start with _ (macOS system accounts like _spotlight, _windowserver)
          # Filter 3: Doesn't contain 'admin' (case-insensitive - catches Admin, sysadmin, etc.)
          # Filter 4: Not a system daemon account (daemon, nobody, root as fallback)
          if (item not in ignore_items and
              not item.startswith('_') and
              'admin' not in item.lower() and
              item not in ['daemon', 'nobody', 'root']):
              regular_users.append(item)

      # ============================================================================
      # VALIDATE RESULTS
      # ============================================================================
      # Why: Ensure we found at least one legitimate user to collect from
      # How: Check if filtering left us with any users
      if not regular_users:
          return {
              "success": False,
              "error": "No regular user accounts found on system"
          }

      # ============================================================================
      # RETURN PARSED USER DATA
      # ============================================================================
      # Why: Provide structured data for Chrome history collection
      # How: Select first user as primary (alphabetically first = often device owner)
      return {
          "success": True,
          "primary_user": regular_users[0],    # First user selected for collection
          "all_users": regular_users,          # Full list for documentation
          "user_count": len(regular_users),    # Count for validation/logging
          "device_id": device_id               # Preserve device ID for tracking
      }

inputs:
  batch_response: ${{ ACTIONS.list_users_on_the_host_device.result }}
What you’ll see: You should see a response listing out all the users as well as the primary user device in a JSON field.
Action 12: Case Comment User Discovery Complete
What it does: Documents the user account discovery results in the case timeline, recording how many user accounts were found and which primary user was selected for Chrome history collection.
Why it matters: This establishes scope documentation for your forensic collection:
- How many accounts existed on the system
- That system accounts were properly excluded from collection scope
How to add it:
- Create a new action with type
core.cases.create_comment - Set dependency on
parse_user_results - Reference the case ID and dynamically insert user count and primary username
case_id: ${{ ACTIONS.create_case.result.id }}
content: "User Account Discovery - Identified ${{ ACTIONS.parse_user_results.result.user_count }} regular user account(s) on target system. Primary user for collection: '${{ ACTIONS.parse_user_results.result.primary_user }}'. System accounts filtered from scope."
Add run condition checking both success flag and user_count > 0:
${{ ACTIONS.extract_session_information.result.status_code == 201 }}
What you’ll see: If you go to the case management view and click on the case that was created at the beginning, you should see a comment within the case.

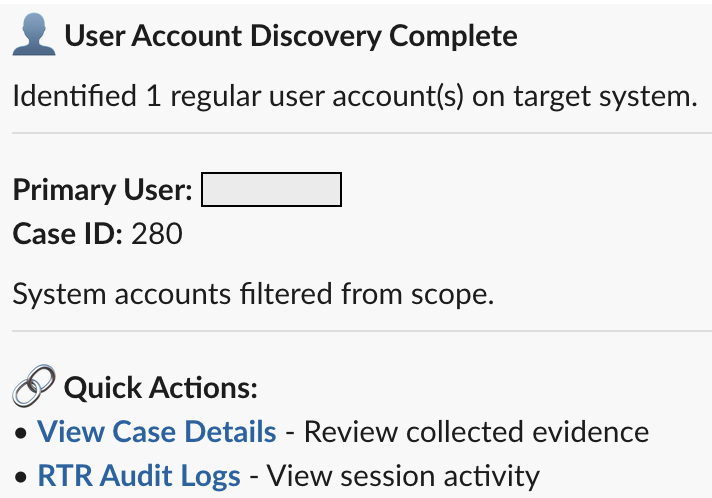
Action 13: Post Message User Discovery Complete
What it does: Sends a Slack alert confirming which user account was identified for Chrome history collection, providing visibility into the workflow’s automatic user selection.
Why it matters: User selection is a critical decision point in forensic workflows. This message provides real-time confirmation that:
- The workflow correctly identified a legitimate user (not a system account)
- The selected username matches expectations (e.g., the host machine being investigated)
- Multiple users weren’t found (which might require manual intervention)
How to add it:
- Create a new action with type
tools.slack.post_message - Set dependency on
case_comment_user_discovery_complete - Update channel ID and URLs to match your environment
- Configure the following fields:
channel: **ADD YOUR SLACK CHANNEL ID HERE**
blocks:
  - type: section
    text:
      type: mrkdwn
      text: |-
        👤 *User Account Discovery Complete*

        Identified ${{ ACTIONS.parse_user_results.result.user_count }} regular user account(s) on target system.
  - type: divider
  - type: section
    text:
      type: mrkdwn
      text: |-
        *Primary User:* '${{ ACTIONS.parse_user_results.result.primary_user }}'
        *Case ID:* ${{ ACTIONS.create_case.result.case_number }}

        System accounts filtered from scope.
  - type: divider
  - type: section
    text:
      type: mrkdwn
      text: |-
        *🔗 Quick Actions:*
        • <https://X.tracecat.com/workspaces/X/cases|*View Case Details*> - Review collected evidence
        • <https://X.CrowdStrike.com/real-time-response/sessions/audit-logs|*RTR Audit Logs*> - View session activity
What you’ll see: You should see a Slack message in your channel that provides all the details you included in the configuration.
Chrome Detection
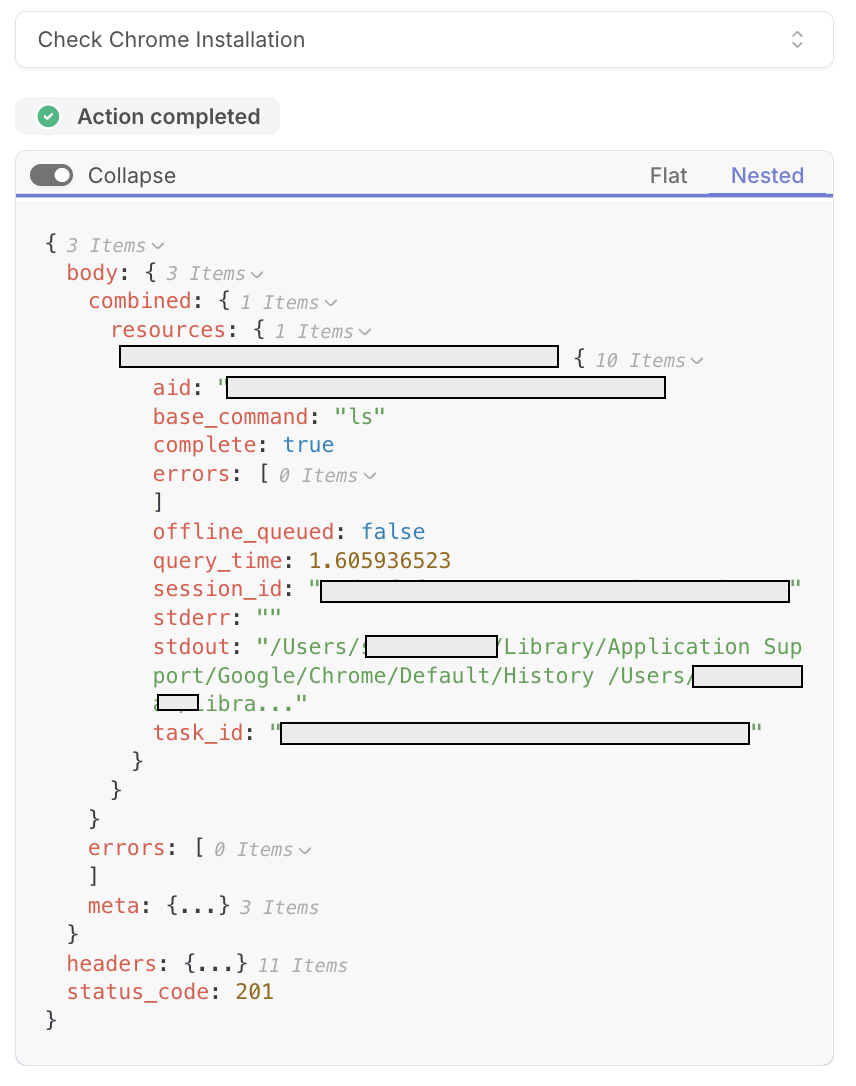
Action 14: Check Chrome Installation
What it does: Executes a ls command to discover all Chrome browser profiles and their History files for the identified primary user. Uses wildcard pattern matching to find History databases across all profiles found (e.g., Default, Profile 1, Profile 2, etc.).
Why it matters: This check ensures we copy all discovered Chrome profile history files. Additionally, some machines may not have Chrome installed or may have multiple user profiles.
This discovery step:
- Confirms Chrome exists on the target device before attempting collection
- Finds all profiles (Default, Profile 1, Profile 2, Guest Profile, etc.) automatically
- Locates the actual History database within each profile’s complex directory structure
- Fails gracefully if Chrome isn’t installed (stderr: “No such file or directory”)
Command breakdown:
ls "/Users/jdoe/Library/Application Support/Google/Chrome"/*/History
                                                          ^^
                                                        Wildcard matches
                                                        any profile folder
The */History wildcard pattern matches:
/Users/jdoe/.../Chrome/Default/History/Users/jdoe/.../Chrome/Profile 1/History/Users/jdoe/.../Chrome/Profile 2/History/Users/jdoe/.../Chrome/Guest Profile/History
This dual-condition check (success == True && user_count > 0) ensures the Chrome installation check only executes when user discovery both completed successfully AND found at least one regular user account. Without this, the workflow would attempt to access /Users/null/Library/... if parsing succeeded but found zero users, or would try to proceed even if the parse action completely failed. The && (logical AND) operator requires both conditions to be true, verifying both “did it work?” and “did we get usable data?” preventing cascading failures and error messages downstream.
How to add it:
- Create a new action with type
tools.falconpy.call_command - Configure the following fields:
operation_id: BatchAdminCmd
params:
  body:
    base_command: ls
    command_string: ls "/Users/${{ ACTIONS.parse_user_results.result.primary_user }}/Library/Application Support/Google/Chrome"/*/History
    batch_id: ${{ ACTIONS.extract_session_information.result.batch_id }}
    session_id: ${{ ACTIONS.extract_session_information.result.session_id }}
Add run condition ensuring user discovery succeeded and found users:
${{ ACTIONS.parse_user_results.result.success == True && ACTIONS.parse_user_results.result.user_count > 0 }}
What you’ll see: a successful discovery will show all Chrome History file paths found on the device.
Action 15: Parse All Chrome History Files Found
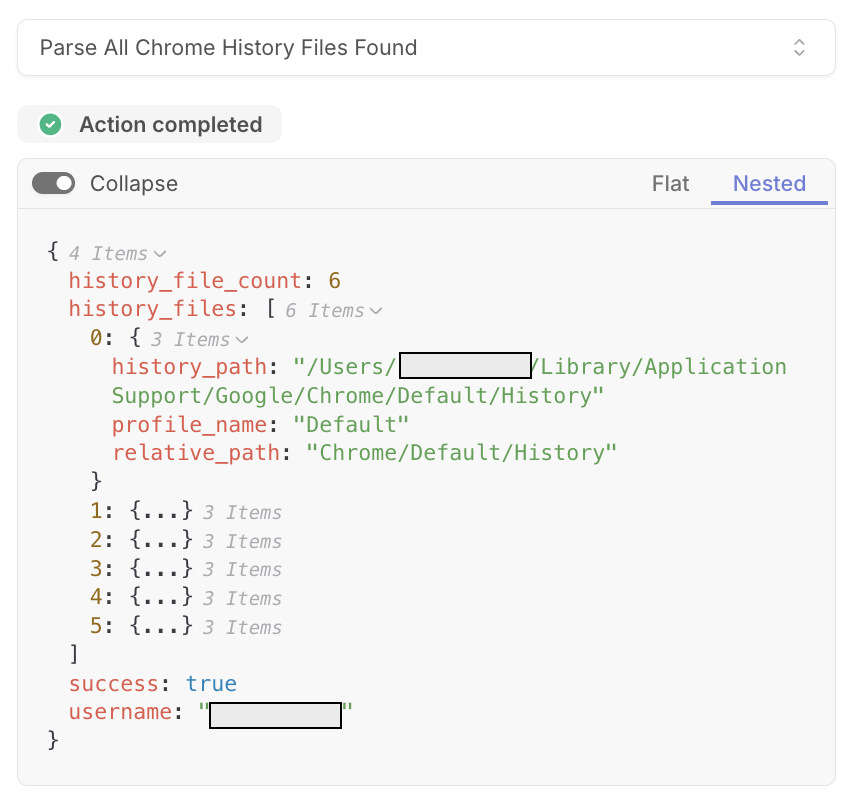
What it does: Parses the Chrome installation check output to extract all discovered History file paths, organizing them by Chrome profile name (Default, Profile 1, etc.) and constructing the data structure needed for subsequent file operations.
Why it matters: Chrome’s multi-profile structure requires intelligent path parsing. This action transforms those paths into structured data containing:
- Profile names (extracted from the directory path)
- Full source paths (for hash generation and copying)
- Relative paths (for organizing collected files)
- File count (for validation in later steps)
Without this parsing, it makes it more challenging and would require additional separate actions for each possible profile. This makes the workflow dynamic and scalable regardless of how many Chrome profiles exist.
How to add it:
- Create a new action with type
core.script.run_python - Set dependency on
check_chrome_installation - Configure the following fields:
script: |
  def main(discovery_response, username):
      """
      Parses Chrome profile discovery results to extract History file paths.
      Organizes discovered files by profile name for structured collection.

      Args:
          discovery_response: RTR BatchAdminCmd response from Chrome discovery ls command
          username: The primary user whose Chrome profiles are being discovered

      Returns:
          Structured list of Chrome History files with profile names and paths
      """

      # ============================================================================
      # EXTRACT RESPONSE RESOURCES
      # ============================================================================
      # Why: RTR batch commands nest results in body.combined.resources
      # How: Navigate through the nested structure to access command output
      combined = discovery_response.get("body", {}).get("combined", {})
      resources = combined.get("resources", {})

      if not resources:
          return {
              "success": False,
              "error": f"No Chrome history files found for user {username}"
          }

      # ============================================================================
      # DYNAMIC DEVICE ID EXTRACTION
      # ============================================================================
      # Why: Device IDs are unique per endpoint - can't hardcode
      # How: Get the first (and only) device from resources dictionary
      device_id = list(resources.keys())[0]
      device_result = resources[device_id]

      # ============================================================================
      # COMMAND COMPLETION VALIDATION
      # ============================================================================
      # Why: Ensure the Chrome discovery ls command actually finished
      # How: Check the 'complete' flag returned by RTR
      if not device_result.get("complete"):
          return {
              "success": False,
              "error": "Chrome history discovery did not complete"
          }

      # ============================================================================
      # EXTRACT COMMAND OUTPUT
      # ============================================================================
      # Why: Need both stdout (successful file listings) and stderr (error messages)
      # How: Get both streams to handle success and failure cases
      stdout = device_result.get("stdout", "")
      stderr = device_result.get("stderr", "")

      # ============================================================================
      # ERROR DETECTION - CHROME NOT INSTALLED
      # ============================================================================
      # Why: If Chrome isn't installed, ls returns "No such file or directory"
      # How: Check stderr for this specific error message
      if stderr and "No such file or directory" in stderr:
          return {
              "success": False,
              "error": f"Chrome not installed or no history files found for user {username}"
          }

      # ============================================================================
      # STDOUT VALIDATION
      # ============================================================================
      # Why: If Chrome exists but has no profiles/history, stdout will be empty
      # How: Check if we got any output at all
      if not stdout:
          return {
              "success": False,
              "error": f"No Chrome history files found for user {username}"
          }

      # ============================================================================
      # PARSE FILE PATHS LINE-BY-LINE
      # ============================================================================
      # Why: stdout contains one file path per line from the wildcard ls command
      # How: Split by newlines and process each path individually
      # Example stdout:
      #   /Users/jdoe/.../Chrome/Default/History
      #   /Users/jdoe/.../Chrome/Profile 1/History
      history_files = []
      for line in stdout.strip().split('\n'):
          # Filter: Only process non-empty lines containing 'History'
          if line.strip() and 'History' in line:
              # ================================================================
              # PROFILE NAME EXTRACTION
              # ================================================================
              # Why: Need to identify which Chrome profile each History file belongs to
              # How: Split path by '/' and get the directory name before "History"
              # Example: /Users/jdoe/.../Chrome/Profile 1/History
              #          path_parts[-2] = "Profile 1"
              #          path_parts[-1] = "History"
              path_parts = line.split('/')
              profile_name = path_parts[-2]  # Get the directory name before "History"

              # ================================================================
              # BUILD STRUCTURED FILE INFO
              # ================================================================
              # Why: Create organized data structure for downstream file operations
              # How: Store profile name, full path, and relative path for evidence naming
              history_files.append({
                  "profile_name": profile_name,           # e.g., "Default", "Profile 1"
                  "history_path": line.strip(),           # Full source path for copying
                  "relative_path": f"Chrome/{profile_name}/History"  # Organized output path
              })

      # ============================================================================
      # VALIDATE PARSED RESULTS
      # ============================================================================
      # Why: Ensure we successfully parsed at least one valid History file path
      # How: Check if our parsing loop found any matches
      if not history_files:
          return {
              "success": False,
              "error": f"No valid Chrome history files found for user {username}"
          }

      # ============================================================================
      # RETURN STRUCTURED DISCOVERY RESULTS
      # ============================================================================
      # Why: Provide organized data for hash generation and file copying
      # How: Return list of all discovered profiles with metadata
      return {
          "success": True,
          "username": username,                    # Preserve username for documentation
          "history_file_count": len(history_files),  # Count for validation
          "history_files": history_files           # List of all profiles found
      }

inputs:
  discovery_response: ${{ ACTIONS.check_chrome_installation.result }}
  username: ${{ ACTIONS.parse_user_results.result.primary_user }}
What you’ll see: A successful parse will return structured JSON containing:
success: true,username,history_file_count,history_files,profile_name,history_pathandrelative_path
Action 16: Case Comment Chrome Installation Verified
What it does: Adds a comment to Tracecat that documents the successful discovery of Chrome browser profiles in the case timeline, recording how many profiles were found and confirming that evidence preservation has begun.
Why it matters: The comment establishes:
- Chrome was definitively installed and accessible on the target device
- The exact number of profiles discovered (critical if defense claims data was missed)
- Which user’s Chrome data is being collected (ties back to user discovery)
- The transition point from discovery to active evidence preservation
How to add it:
- Create a new action with type
core.cases.create_comment - Set dependency on
parse_all_chrome_history_files_found - Add run condition checking parsing succeeded
- Configuring the following fields:
case_id: ${{ ACTIONS.create_case.result.id }}
content: "Browser Evidence Located - Chrome installation confirmed for user '${{ ACTIONS.parse_all_chrome_history_files_found.result.username }}'. Discovered ${{ ACTIONS.parse_all_chrome_history_files_found.result.history_file_count }} Chrome profile(s) with history files. Evidence preservation initiated."
Add run condition ensuring user discovery succeeded and found users:
${{ ACTIONS.parse_user_results.result.success == True && ACTIONS.parse_user_results.result.user_count > 0 }}
What you’ll see: If you go to the case management view and click on the case that was created at the beginning, you should see a comment within the case.

Action 17: Post Message Chrome Installation Verified
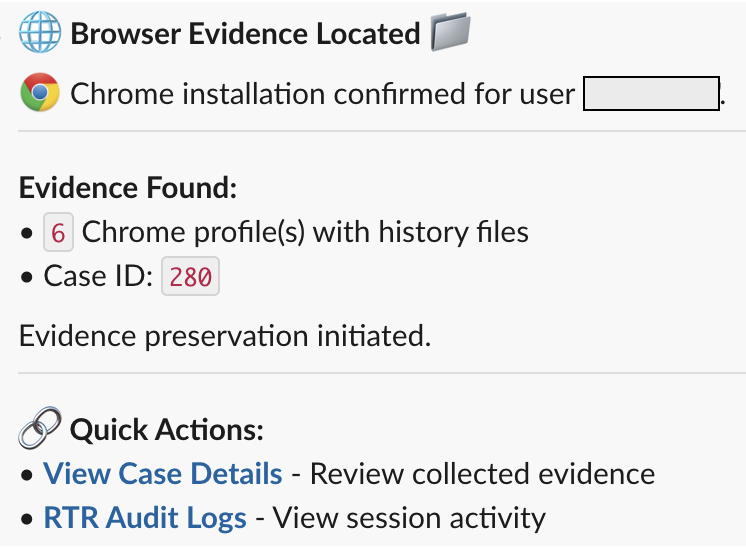
What it does: Sends a Slack alert confirming Chrome browser was found on the target device, including the number of profiles discovered and signaling that active evidence collection is beginning.
Why it matters: This alert notifies the team about the following:
- Chrome exists and is accessible
- How many profiles will be collected as it sets expectations for evidence volume
- Evidence preservation has started and file operations will execute shortly after this.
How to add it:
- Create a new action with type
tools.slack.post_message - Set dependency on
case_comment_chrome_installation_verified - Update channel ID and workspace URLs
channel: **ADD YOUR SLACK CHANNEL ID HERE**
blocks:
  - type: section
    text:
      type: mrkdwn
      text: |-
        🌐 *Browser Evidence Located* :file_folder:

        :chrome: Chrome installation confirmed for user '${{ ACTIONS.parse_all_chrome_history_files_found.result.username }}'.
  - type: divider
  - type: section
    text:
      type: mrkdwn
      text: |-
        *Evidence Found:*
        • `${{ ACTIONS.parse_all_chrome_history_files_found.result.history_file_count }}` Chrome profile(s) with history files
        • Case ID: `${{ ACTIONS.create_case.result.case_number }}`

        Evidence preservation initiated.
  - type: divider
  - type: section
    text:
      type: mrkdwn
      text: |-
        *🔗 Quick Actions:*
        • <https://X.tracecat.com/workspaces/X/cases|*View Case Details*> - Review collected evidence
        • <https://X.CrowdStrike.com/real-time-response/sessions/audit-logs|*RTR Audit Logs*> - View session activity
What you’ll see: You should see a Slack message in your channel that provides all the details you included in the configuration.
Conclusion
That’s it for part 1
In 17 actions, we’ve created a foundation that:
- ✅ Validates the target device exists and is macOS
- ✅ Establishes an RTR session
- ✅ Discovers user accounts automatically
- ✅ Checks and validates Chrome installation and profile count
- ✅ Creates an audit trail
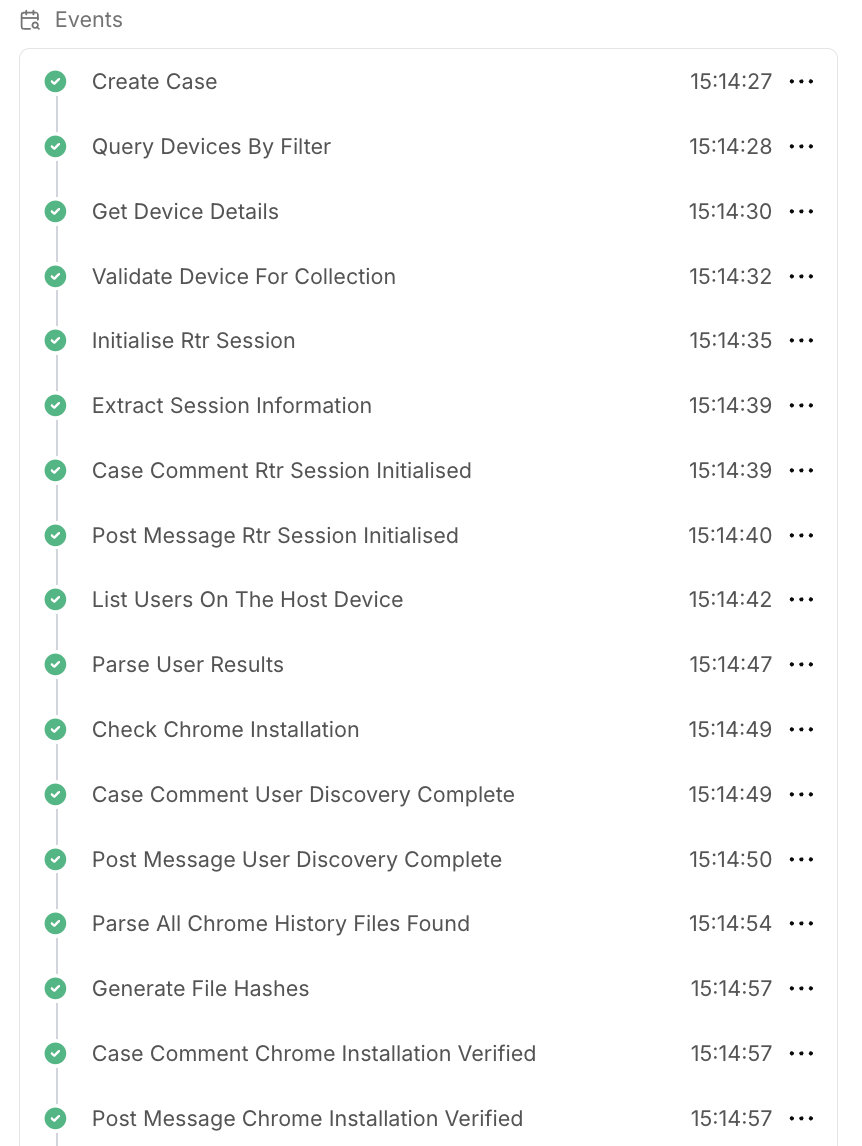
And we haven’t touched the user’s files yet. That’s intentional - measure twice, cut once.
I wanted to introduce a few different concepts and provide a gentle introduction to building with Tracecat. I hope you stay tuned for part 2 where things get forensically interesting. We’ll be going over hashing evidence files, incorporating loops to account for instances where there are multiple Chrome profiles, copying the files to a temporary directory and preparing to upload the zip package to RTR cloud.
Challenge For You: Build Part 1 and test it on a macOS machine. Get to the Chrome detection step.
I’d love to see how you progress and please share your results on social media or the Tracecat Discord channel.
If you have any questions or if you’re stuck, drop me a DM or send me an email. I’m also in the official Tracecat Discord.
If you found this helpful, I’d love for you to share it with your security peers so we can raise the bar on security automation together.
Next in the series: Part 2 - The Collection Engine [November 2025]